Photoshop tutorials for Car photo editing has significant value for presentation and marketing these days. The editing methods are very effective to bring out perfection in photographs. Professional photographers are able to capture the best moment and angle with their expertise. Also, cameras today are capable of taking photos with high details.
So, there is a question, “Why do you need photo editing for automobiles.” The answer is, to achieve a flawless and perfect visual presentation of a vehicle. Professional photography is good for the shot. But, photo editing roles for the error removal and creating naturally beautiful photos you need.
Tutorial for car photo editing can give you some ideas about image modification. The operation requires experts’ hands for the best results. You can take services from professionals in exchange for a small amount of money. Or, you can try by yourself if you have that time and patience.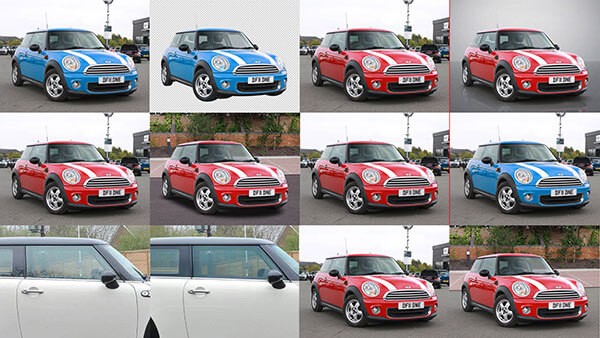
Car photo editing with a professional look is not impossible for any individual. But, you need to concentrate on the work and spend enough time to learn the steps one by one. If you want to do it by yourself, we bring you some short tutorials for your support.
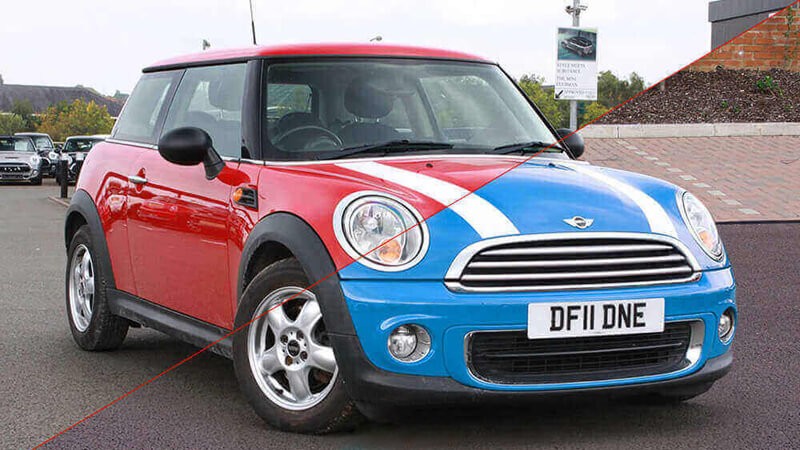
Automotive Clipping Path in Photoshop
The Clipping Path for car/vehicle photo editing is to isolate the subject from the background. Here the car is the subject and all others are the background. For the operation, you need to use photo editing software. We prefer Photoshop for the best performance.

Use the Pen Tool and start marking from an anchor point (a corner or an angular point). Left-click once at the point and go for another point. Click and drag for the second point to show the handles. You will find two handles. Each of the handles creates a path direction or curve amount.
You can modify the path holding a handle and move or stretch. Follow the same to create a path around the car and end up at the first point. You can save the path for safety by double-clicking on the path layer. Or, you can make a selection by using Ctrl/Command+Enter/Return for Win/MAC.
Then you can copy the selection to a new layer by pressing Ctrl/Command+J for Win/MAC. Hide the original layer and you will find the vehicle area only on a transparent background in photoshop.
Removal Background From Photo
The removal of background is one of the basic operations of automotive photo editing. The work steps start with the selection. You can use a convenient selection tool from Photoshop for your subject.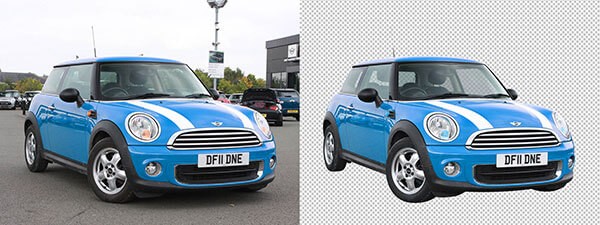
If you have a subject with hard edges over a solid-colored background, you can use the quick selection tool. But, if the subject is with hard edges but the background is busy, you need to use the Pen Tool then make a selection.
You need to use Photoshop artificial intelligence if the subject is with a hard edge over a busy background. Well, there are other selection tools you can use such as Marquee Tool, Lasso Tool, etc. for the purpose. Also, you can use the Background Eraser Tool to remove the background in a different way.
Add New Background or Dealership Background
To add a new background, you need to isolate the subject from the existing one. You can use the Clipping Path or Background Removal option for that. Or, if you have a subject or car image over a transparent background, you can do it directly.
Open the vehicle image in Photoshop, isolate it from the original image, and add another background. Place the new background under the isolated vehicle layer and you have a background change.
However, you need to be smart with the background selection to match the vehicle image. Otherwise, you may change the background but it will look like bad editing.
Matching Car With Background
One of the most important parts of automotive photo editing is Matching With Background. We have mentioned the issue on the last point. So, how can you do car image editing by matching the background?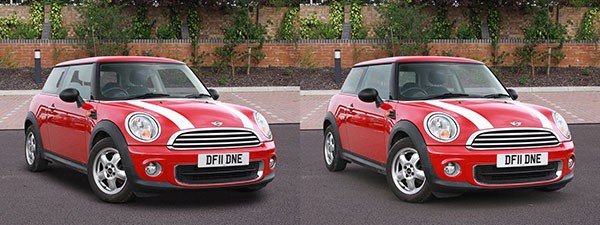
First of all, you need to choose a background that matches the subject image. The tone may be different but the background should be related to the vehicle presentation. Place the vehicle image over the background and use the Hue/Saturation Adjustment Layer to match the tone.
You can change the tone of the subject or the background. Both ways are almost the same. Also, you can add some effects from the “Create new fill or adjustment layer” option. Try some of them to know the purposes and apply what you need.
Drop Shadow Car Photo Editing
Drop Shadow for automobile photos is mandatory for a complete view. We get the shadow of an object according to the light direction. But we use Photoshop Shadow to create a natural-looking shadow. So, isolate the vehicle from the background to a new layer.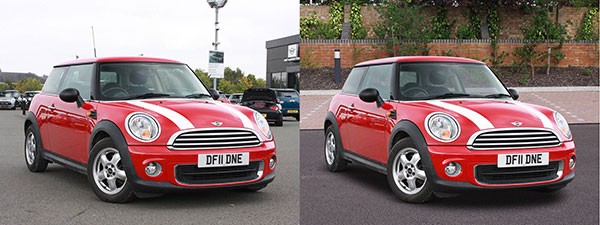
Then double-click on the layer to see the “Layer Style” window. Select the “Drop Shadow” option from the tree placed at the left and make the necessary changes you need. You can change the shadow color, distance, spread, and many more here. Press OK when you are done with all the adjustments.
Natural Shadow Car Image Editing
Adding a natural shadow while car photo editing service is a matter of expertise. You can use the drop shadow for a quick application. But, if you need to keep the original shadow, you need to add that separately. You can select the original shadow from the photograph and add that to the isolated vehicle image.
Do some modifications with the “Underlying Layer” and the edge of the shadow. Use mask to modify the shadow edge as much as you need. The masking process is non-destructive and nothing to worry about going back to the original form.
Reflection Shadow For Automotive Editing
The reflection shadow addition with the vehicle photo is a different kind of process. Isolate the subject from the background and place that on another one or on white. Now copy the subject and past flipped upside down. Place it below the car and decrease the opacity a little bit.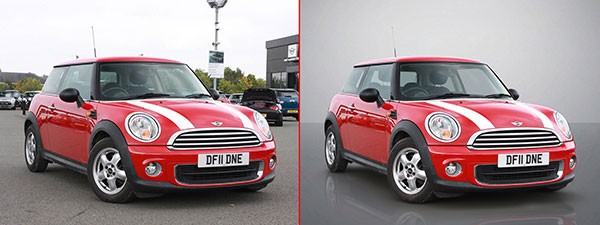
Now, mask the layer and make it invisible in a few areas around the edges. Do the modifications as much as you need to create a good reflection shadow. Do not overdo it as it may look cheap editing. Try to maintain a natural shadow effect like on glass or on a glossy surface.
High Quality Car Photo Retouching
Retouching any product surface gives you a smooth and flawless impression in photos. And, you will need photo retouching for vehicle image editing the most. Use the Healing Brush Tool and the Clone Stamp Tool to correct any kind of impurities. Look for spots, marks, scratches, and any other impurities you see.
Take some time and correct those impurities one by one with proper sampling. You can take a sample by pressing and holding the Alt/Option for Win/MAC and click on an area. Then release Alt/Option and brush over the impure areas to correct.
Changing Car Image Color
Automotive Photo Editing with color-changing is like magic in Photoshop. All you need to do is select the color that you want to change. Open the car/vehicle image in photoshop and add a Hue/Saturation Adjustment layer.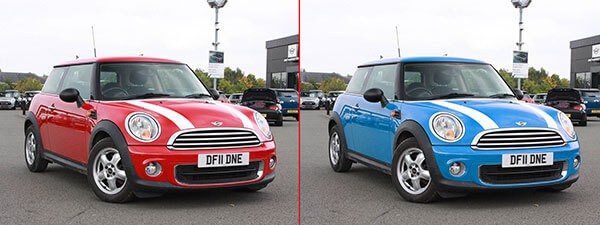
Use the hand tool from this adjustment layer and click on the color you want to change. Do not worry about shades of texture. Photoshop will automatically adjust the color and distribute as required.
You need to move the sliders for both Hue and Saturation to the right for the next step. Now you can work with color expansion to make the range of color coverage. The option is at the bottom portion of the Hue and Saturation window.
Move the sliders a little to distribute colors at all places. Take the sliders of Hue and Saturation back at the middle for standard color. You can choose any color moving the Hue slider and see the magical changes.
Car Photo Manipulation
Image Manipulation for car image editing is an additional part to add or implement. Presentation with a regular car photo is alright for standard marketing. But, Car Manipulation with different kinds of themes is sometimes effective.
You can add vinyl artificially to improve the visualization. Or place the car to a different dimension of the earth where it may look amazing. So, isolate the subject from the background and place another one. Then add some effects from the “Create new fill or adjustment layer” and choose one.
Also, you can add other objects around the car like rocks, sand, sea, etc. Well, this manipulation is a creative work and with millions of themes and operations. So choose your theme and go for the editing.
Conclusion
Today some websites offer free editing of photographs online with limited options. You can try them but, the result will not be satisfactory and the free options are a few. So, automotive photo editing should be done by professionals or by yourself after learning.
The tutorial for automotive photo editing we mentioned here are simple and short. The explanation of the things in detail is impossible in this short article. But, we will come with a detailed tutorial later with elaborated words. You can follow this for the time being. And, try to show your ability with creative works.