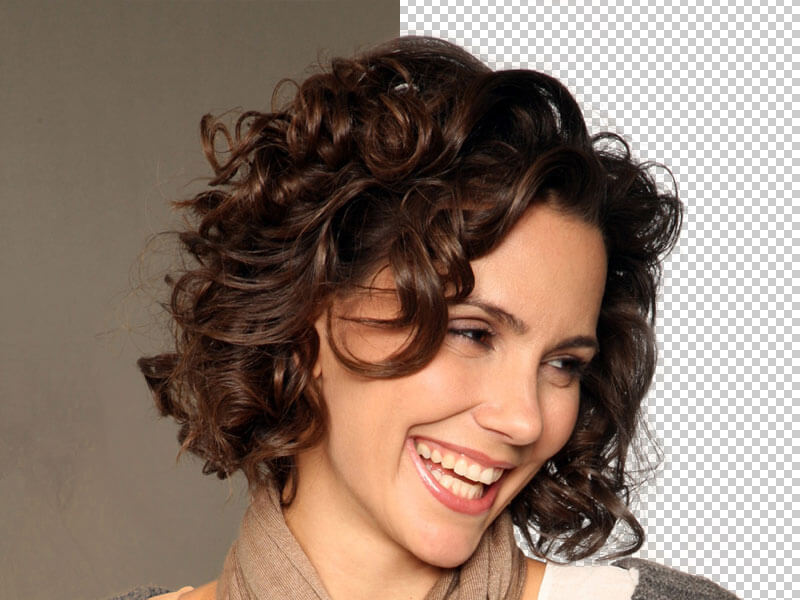
Generally, transparent background tends to make the selection procedure straightforward and also can make a comprehensive selection such as extracting tree leaves, selecting hair, etc. Generally, creating a detailed transparent background for your website’s pictures and product photos in Photoshop typically opens up an extensive range of attractive display selections for all your featured products.

Essentially, creating a transparent background using Photoshop makes everything detailed and straightforward. However, attempting to complete these steps without a supportive guide might be challenging, especially if it your first time.
Fortunately, I have deep-researched and come up with dependable and top-rated steps to help you rightly make a transparent background in Photoshop. And without further ado, allow me to take you through an ultimate format on how to eventually create a detailed transparent background.
1. Transparent Background in Photoshop: Use the photo in a layered file.

First, open the Photoshop, followed by opening the specific image of the product in it. Besides, most images are in JG format, meaning a product photo editing with specific background color is utilized to typically complete this format.
Therefore, look for a layer panel in Adobe Photoshop. And at this point, the panel remains specifically on the right side of the image window. However, consider clicking right on the window to find it if you will not find it here. Further, navigate to the layers section from the main menu bar, which is positioned at the top of the Photoshop window.
To this particular layer panel zone, you will come across the background layer. So, double click the background layer, and automatically, it will pop up another layer dialog box asking you to eventually rename the layer. So, consider to naming it as you would like, or preferably you can choose not to change the name.
Further, the name will typically default layer zero, and this directs you to save it followed by clicking okay. Your photo background layer will be unlocked at this point, while the image editor can simply delete anything in your specific image, which will help you create a transparent background.
2. Use a mask and select to refine your selection for complex subjects

Chances are many selections are pretty ideal. However, for some of us working with well-defined edges object, the magnetic lasso tool is the easiest route to move ahead to the next step. However, for the objects with a bit less defined texture, edges, and wildly irregular shapes, consider the mask and select tool to often have excellent results. And for the objects with both, you can effectively utilize both methods.
Utilize the brush tool right from the toolbar located on the left to select plus icon in the top toolbar. Further, brush over everything that is supposed to be comprised in selection, but it is not. Preferably, you can also click the minus icon positioned on top to eventually brush over the pieces which should not be part of your selection. And remember your specific goal is selecting the main subject leaving the specific background you want to make transparent PNG unselected.
Additionally, if your brush is choosing too much, consider zooming in and utilize brush size located next to minus or plus icons on the top. Again lower the specific radius right in the properties toolbar, and if your brush is not choosing enough, utilize a large brush and increase the radius. And before you move to the next step, zoom in on the edges, ensuring you won’t leave any selection out.
3. Create Transparent Background in Photoshop: Select your selection

Utilize the tool known as the magic wand tool in this specific step for excellent results. Besides, someone can typically find a magic wand tool on the left side of your processor. Look for the selections bar on Photoshop, followed by searching for the subject and clicking it. Generally, this will aid in selecting the primary object from the photo. And as a result, the background will eventually separate right from an object of your image.
In essence, when selection is not perfect enough, this magic wand tool can remove the specific backdrop right from the selection area. And thus, the graphic editors can mechanically add more of your product for selection depending on your selection. Additionally, after creating the selection, ensure you also choose specific areas where right in your product photo.
4. Continue refining with the eraser and lasso tools

Generally, Photoshop has different selection tools, so you should ensure everything is detailed, especially when you want to make a transparent background in Photoshop. While magic wand tool and mask and select operate well, many and different objects which are a bit challenging to select, such as individuals with hair, the magnetic lasso tool is also helpful.
This specific tool is also faster and dependable to use on well–defined edges. Therefore, continue to refine your specific selection after the magic wand tool, or preferably you can move to this step if you want to cut out an object with defined edges. So, select this magic lasso tool which is located on the third right at the top of the default toolbox, Click and hold, followed by selecting magic lasso tool from the dropdown.
Meaning, if your image has straight and well-defined edges, the polygonal lasso tool might be the simple selection but cannot work with curves. Click around the outer perimeter of your image to select the extra background zones you are targeting to remove. Besides, the magnetic lass will quicken the image’s sides, ensuring you often click to aid it to stay on the right track.
5. Make Transparent Background Using Photoshop: Erase the background

After you have selected the object, select the specific inverse via typing the shift+ctrl+I. Besides, this option is accessible in the select panel. Once you click using your mouse button, you will come across the inverse selection right at the down of your menu. After you select the inverse background, move on and click Backspace, and you will automatically come to a transparent background.
Generally, the best way to achieve an image with transparent background is utilizing the layer mask. The layer mask enables you to simply go back whenever you might want to make some image parts more clear or preferably, you made a mistake while selecting and you want to perfect. Therefore, when working with a layer mask, click the second button located at the bottom of the layer panel to typically add the layer mask.
Besides, if you release, you made some mistakes; all you need is to choose the layer mask followed by painting over that zone with a white brush. Also, in some cases, when using these tools, we can get some hard edges visible on the subject that is not really necessary. Therefore, to soften them, manually mask those specific zones via painting over your layer mask using the soft black brush. This brush will make the results more accurate and clean up all unwanted parts and edges.
6. Use the web-ready format to save the photo

Creating transparent background is the foremost step of Photoshop. Besides, the Photoshop editors are always attentive, ensuring they eventually save the product of the photo inappropriate format. Since this makes it easy to utilize on websites of all e-commerce products.
And as a result, the PNG-24 is the dependable and format to save your photo. The benefit of this specific format is many like having transparency of numerous layers. GIF and PNG-8 are among the oldest file format for making the background transparent in a photo. However, they are tested and approved to add an implausible halo effect to your image and why we choose to utilize the PNG-24 format.
Generally, we got different keyboard steps for saving any file in PNG-24 format. Therefore, consider pressing shift followed by alt to ctrl and, Press all these specific buttons once. Further, another way to eventually open this file option move to export direct to export As. In essence, this feature is accessible in Photoshop’s older version, and if export AS is not found in your version, you preferably select the save for web option. Next select PNG-24 present in the menu on the right-hand side of the specific dialogue box.
Now in a dialogue box, you will come across the file set on the right on the box, and here there is also a format option and PNG format, so tick the transparency selection. Now, wait for the PNG file with the format where this format is found on the left-hand of the photo. Check the image size for the website; remember, large size images tend to decrease the specific speed of website loading while smaller size images are appropriate for use on any internet.
Remember, on the website; many clients will want to see all the details of a photo. So whatever is the ratio of the website, consider saving the images in larger sizes. Some individuals have a massive display, while some have a mobile display, so select the ratio that will eventually fit all categories with appropriate depth.
Overall, you will require a little balance to operate with to typically minimize your photo size while also minimizing the file size. And to minimize the load time, you can opt to have the photos of the featured products saved bigger for retina displays and also remember to allow the bulk of your product photos to get saved at actual size.
7. Photoshop Transparent Background Create : Save the file as PNG

Now that you have the appropriate image size of your image, click exports all. On the next move, you will come across a dialogue box, and inside it, you will also find the selection of choosing the folder. Besides, it’s also best idea when you keep the optimized image files a bit separate from the original image files and avoid confusion when you are loading the images into a specific site. This is the last but essential step to create a transparent image, name your image file, ensuring its extension is detailed set to PNG, followed by saving the image.
8. The benefits of adding a transparent background in your Photos
(a) Creates more visibility of a text

Advertisement of social media and websites are specific tools for marketing products. And in this case, your background of images depends a lot. Further, the exposure, colors, contrast, brightness composition should still be appropriate in sync with the image.
(b) Makes the image background simple

Generally, the background that is decorative and demonstrated can typically add many design characters. But this type of background is a bit hard to eventually see in the text, so the transparent background is the perfect solution.
(c) Make a fresh and airy presence
The designer’s sense will portray easiness and openness in the layout when a design is transparent. Thus, to gain a minimalistic layout, decent layout, and new front, you require having the best background series shape.
(d) Display the inside fabric
The graphic editors may also use transparency in the packaging of the magazine cover, product, food, and other related categories of attachment. Besides, this transparent background method aids reveal what is inside that specific package, and as a result, this can boost up selling of items since a customer will see any products beneath the package.
(e) Speeds up specific page loading
This is among the underrated benefits for making your image background transparent. Increases the speed of your web page, this is essential because your customers will not go to purchase your specific product when they cannot a page to load. Overall, faster page loading is practically essential on many mobile versions of different sales apps.
(f) Increases the product attention
Whenever, there is zero noisy background on any image, this allows the customer to typically focus on item targeted to get sold. The transparent backgrounds allow the product image to clearly be shown. And when you make a detailed background transparent Photoshop, this will allow you blend the photo with different color for more appealing appearance.
(g) Integrate product in many sales channels
Generally, every beneficial e-commerce merchants have idea that getting most eyes on our product is perfect way for maximizing sales. Again not every online e-commerce platforms like Amazon, eBay, Craigslist etc. have similar image formatting. And this is particularly true when considering mobile versions of these specific sites, and as a result the transparent background will ensure seamless integration to all your formats.
9. Frequently asked questions on creating transparent background in Photoshop

(a) How can I create a transparent logo in Photoshop?
1. Download the Photoshop to your processor; open the logo in the Photoshop
2. Move to layer then new layer from a specific menu
3. Utilize the magic wand to choose the area of the photo you want to remove the background
4. Save all the changes you will make
10. Can someone make JPG transparent?

Unfortunately, the JPEG format cannot support transparency. So, someone can make the specific background of a photo similar to the page background.
11. Do BMP files fully support transparency?

Raster file formats that support transparency comprise PNG, GIF, TIFF, TGA, BMP, and JPEG 2000 via the alpha channel or transparent color. Besides, many vector formats tend to support transparency since they avoid putting objects to a given point.
12. How can I convert the JPG to PNG?

1. Open paint software, press CTRL+O then open the JPG file
2. Move to the menu, click on the save to as selection
3. You will automatically see the popup window, and in this case, select PNG in the extension dropdown
4. Name your file, press file, and now convert the JPG photo to a PNG image with transparent background
13. What is the main use of the transparency background in images?

Besides, transparency makes it straightforward to create the nonrectangular photos for the websites. Further, the background transparency that is supported by the PNG and GIF formats tends to preserve transparent pixels right in your image. Additionally, it allows the specific background of a web page to typically show through transparent zones of someone’s image.
14. What is the reputation of transparent background layer in any Photoshop?

The background is essential part of image which is farthest from audiences. This layer is anytime protected/locked meaning someone cannot change its specific stacking order, opacity or blending mode. May be if you can convert it to regular layer which is also challenging without supportive guide.
15. What is color of transparent background?

The specific color of transparent object will depend on the color of the illumination it transmits. Meaning, if the green illumination passes via transparent image the emerging light will turn green and so on. However, materials such as plastics and frosted glass are known as translucent.
Conclusion
When executed appropriately, the transparent background can aid put the specific spotlight on a specific portion of an image. Further, you can utilize the transparent layer as background or shapes to eventually guide the audience’s perspective while also enhance the layout.

Generally, a transparent background is simple to create using Photoshop, but it might be a bit challenging without a supportive guide. I have made everything easy for you because the above are comprehensive steps tested and approved to give you a decent and accurate transparent background photo creation.