Have you been desiring to learn the essential basics of fashion photography? Or you just bought your very first DSLR and looking for dependable and simple and easy photography tips for beginners this article will significantly help you.
Generally, in photographing industry, you need reliable tips and techniques to help you start building a solid and beneficial foundation towards your success in photographing. Even the well-established photographers make mistakes, but they keep improving from tips like below.
However, it might be challenging to choose the best and top-rated strategies without a supportive guide. And this is because you will come across different and countless tips out there where some might even are ineffective and unhelpful in your dream journey to photographing.
Luckily, I got you covered. I have deep-researched and came up with reliable, easy, and functional photography tips for tested and approved to meet your need and expectations. So, without further ado, allow me to take you through a comprehensive guide with the 14 best photography tips for beginners.
(A) Below is a quick and brief overview of practical and dependable compositional techniques you should never forget for successful fashion photography.
– Leading lines
By utilizing the obvious/ not obvious leading lines in your images, you will typically lead your specific viewer’s eyes via your photo, making it more attractive.
– Symmetry
Symmetry helps in capturing reflections in small puddles or bodies of water. Further, it can create balance in your images, making them pleasing.
– Rules of thirds
This rule tends to break images into horizontal and vertical thirds. The photos will be interesting and balanced with this rule.
– Rule of triangles
This rule can create the best sense of relationship on three pints of a triangle, giving your images unity.
1. Learn to hold the camera appropriately
This first step might sound obvious, but in many cases, new photographers fail because they don’t hold a camera in the right way. And this causes the camera to be blurry and shakes images leading to poor results. Besides, tripods can be the perfect way for preventing your camera from shaking, but because you are shooting and you cannot use a tripod, it’s essential to perfectly hold the camera for excellent results.

In this case, practice holding camera on both hands, further grip the right side of it using your right hand, followed by placing the left hand below the lens to eventually support camera weight. Overall, the closer your camera right to your body, the more motionless you will hold it.
2. Begin shooting in Raw
This is a perfect file format such as jpeg, and it captures image data recorded by the user’s camera sensor instead of compressing it. Therefore, when you begin shooting in raw, be sure to have higher quality photos and more control in your post-processing.
Further, you easily correct common issues like underexposure or over while adjusting things such as white balance, color temperature, and contrast. And if you don’t know how to effectively switch from jpeg raw, consider checking your camera’s instructions.
3. A wide aperture is perfect for portraits photography
In essence, when shooting portraits photography, whether of animals or people, you should focus on a specific image. An ideal way to eventually achieve this is by using a wider aperture; this will help keep your vision sharp and blur out all distractions right in the image background.
And to appropriately understand the way aperture can affect your photos, consider switching to aperture priority mode and try to take some shots right with different apertures.
4. Be careful on-camera flash.
Not getting careful when using the built-in flash in low light or during the light might lead to unpleasant effects such as harsh shadows and red eyes. Overall, it would be better to get noisy photos or ISO than on-camera flash, which ruins shots together.

However, you can sometimes get yourself in such situations, so if this is the case, find your flash settings right in your camera menu, reduce brightness and try to diffuse light from flash via putting something against it.
5. Understand exposure triangle
The exposure triangle refers to three essential elements of product photography exposure: shutter speed, ISO, and aperture. Therefore, when shooting in manual mode, consider balancing these three things to get well-lit and sharp photos.
ISO tends to control the user’s camera sensitivity of illumination, meaning with low ISO, your camera will get less sensitive to light. On the other side, higher ISO means the camera will get more exposed to illumination. Shutter speed tends to control how long the shutter stays open when someone takes the picture. Meaning the longer shutter stays open will be more light gets into the camera sensor.
When it comes to aperture, this is opening in the user’s lens, and its controls how much illumination gets to the camera’s sensor. Therefore, a wider aperture can allow illumination while a narrow aperture allows light through. Therefore, a wide aperture is an excellent way for photographers who might want to isolate their subjects.
6. Learn adjusting white balance
White balance help when it comes to capturing different colors more precisely. Generally, different types of illumination have various characteristics, meaning if you fail to adjust, colors in photography might take on a slight orange, blue or green hue. However, the white balance can be effectively fixed in post-processing but can be challenging with hundreds of images that need to get adjusted.

Therefore, get in your camera first and adjust the white balance. There are different white balance standard settings in your camera, including daylight, shade, automatic white balance, tungsten, flash, fluorescent and cloudy. And each of them is symbolized by various icons; meaning can perfectly work in different situations of fashion photography.
7. Play with perspective
The perfect way of getting more creative in your product photography is practicing perspective. Besides, the same scene may often appear different when approached right from a different angle, while capturing the subject from below or above might change the entire feel of the photograph.
Generally, not each angle will often work for each photograph, and since you cannot decide which will work and not always play with perspective. For example, when shooting children or animals, try and get down to their specific level viewing the world via their eyes. Like when shooting things like portraits, why will not stand right on the bench to shoot a clear subject from above?
8. Shoot in the evening or early morning
Lighting can break or make your images. Early morning or evening tends to be widely believed as the perfect times for taking clear and attractive images. Suppose you are shooting portraits, landscapes, or still life; consider using evening or early morning light because it will provide you with admirable photos due to its long shadows and warm glow.
9. Learn to utilize different focal lengths
In essence, different focal lengths will provide you unique and different results even in similar locations. Below are few different and top-used focal lengths a beginner can use to create attractive images:
– ( think 70 plus mm) Zoom focal length
These specific focal lengths can get used to compress background or preferably selectively compose different subjects in a composition.
– Wide-angle ( 24mm think and above)
When you use this focal length, someone can be capable of creating a deep field using different layers of photos. I like using I when shooting the landscape photos from a lower perspective.
– Mid-range ( think 50 mm)
You can effectively throw out background and separate subjects from specific locations to pop with this pop.
10. Learn to use shutter and aperture priority modes
In the shutter priority mode, someone can choose the shutter speed of your choice where your camera will choose that aperture for you. For example, you might want to eventually clear a shot on dog racing, select the speedy shutter and allow the camera to select this aperture for you.
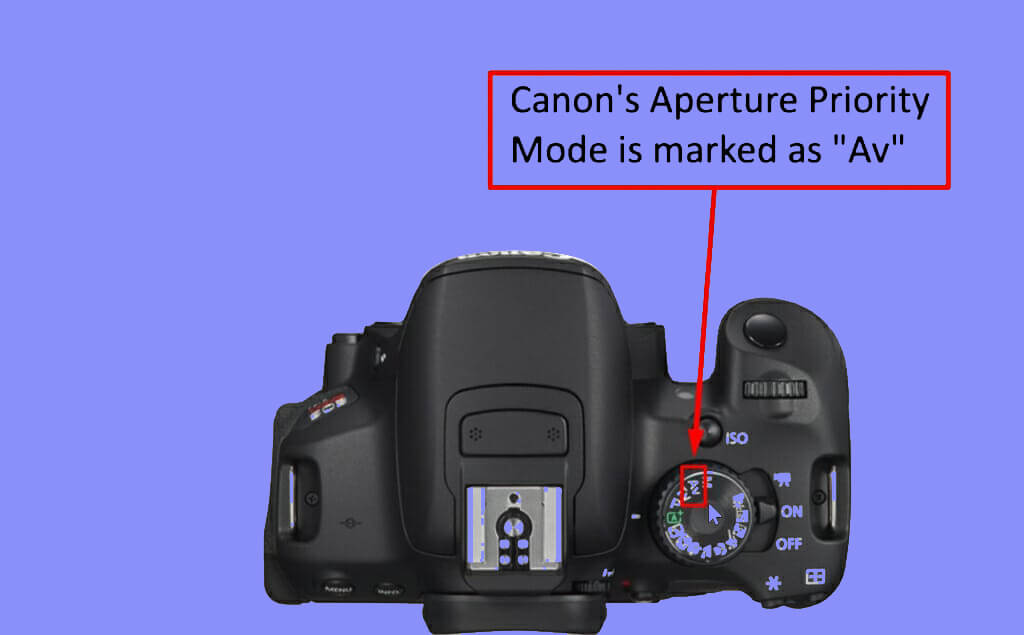
Conversely, aperture priority mode allows someone to choose a specific aperture they want, and your camera adjusts shutter speed precisely. For, example if you’re going to shoot a portrait with blur background, select a wide aperture and allow your camera to figure out the perfect shutter speed for you.
11. Narrow aperture in landscapes
The landscape images need a different approach because things there should get into sharp focus. Therefore, you need nothing but entirely focus when shooting in such scenes, and a narrow aperture can significantly help you in this case.
12. Feel free to raise ISO
Many beginners in photography avoid shooting in higher ISO because they are totally afraid because it might lead right to grainy-looking images or noise. In this case, understand that there is a place and time for everything when it comes to photographing. So we showing product photography tips for beginners photographer which will help you to shooting perfect image.
Therefore, if you cannot lower shutter speed because of the motion blur, it would be better and helpful to get a sharp image with little noise than no image completely. Yes, it is possible because you can remove the noise while processing. Overall, the best and helpful tip to reduce noise when you are shooting in higher ISOs is using a wider aperture if possible.
13. Understand the specific rule of thirds
This rule is based on getting images which are well balanced and exciting when still not centered. Of course, this is every photographer’s dream as automotive photography needs persona expression and creativity. When following the third rile, instead of positioning essential elements or subject of a specific scene right center of the image, you will place them alongside one of four different lines or on pints where there is a line intersection.
14. Experiment with filters
Besides, filters can aid someone in taking exciting and unique photos when you have enough experience in filters. Therefore, the polarizing filter is a fantastic tool for adding someone’s arsenal, which can aid your images lit.
Besides, the filters operate by reducing excess reflections while also adding a bit of contrast to your photos. But remember that there are some situations you are supposed to use polarizing filters, such as at sunshine, light conditions, and sunset.
Conclusion
Learning and understanding the above techniques ensure that your photography journey and career will be smooth and productive. I have worked in the photography industry for years now, and in my successful career, I have also used the above tips and are working magic for you. You’re not exceptional, and you can make it in this industry. Everything becomes easy and accessible with detailed and easy tips like the above. Good luck