Ever wondered how to make a mannequin vanish from your photo? Well, wonder no more! I’ve got a step-by-step guide to help you achieve this effortlessly. First things first, fire up Photoshop and open the image you want to edit.
Now, let’s start by creating a fresh layer. Simply head down to the Layers panel and hit that “New Layer” icon at the bottom. This new layer will be your canvas for this artistic endeavor.
Next up, we need to tell Photoshop which part of the photo to magic away. You can use handy tools like the Marquee Tool, Lasso Tool, or the precise Pen Tool to select the mannequin. Keep your new layer selected while doing this.Once your mannequin is selected, it’s time to make it disappear from this reality. You can either ‘Cut’ or ‘Copy’ it by right-clicking on the selection and choosing the desired option.
Now, here comes the fun part – the Clone Stamp Tool. It’s like your Photoshop magic wand. Hold down the Option key (on Mac) or the Alt key (on PC) and click on a nearby area in your image that you want to use as a disguise for the mannequin. Think of it as your cover story.Once you’ve got your cover story, start painting over the mannequin using the Clone Stamp Tool. It’s like artistry on a digital canvas. Keep at it until the mannequin blends seamlessly with its surroundings.
For complex images or if you’re a perfectionist, don’t hesitate to repeat this process, sampling different source areas and cloning a few times for that flawless finish.
When you’re satisfied with your masterpiece, it’s time to bring everything together. Select all your layers, and with a graceful touch of the keyboard, press Command + E (on Mac) or Control + E (on PC). This will merge your edited layer with the original background.Lastly, save your edited photo as a brand-new file to preserve your original masterpiece. Head over to File > Save As and pick your preferred format, like JPEG or PNG.
How Do You Edit a Mannequin
Method 1: Content-Aware Fill (for Less Complex Backgrounds)
Open the Image: Initiate by launching the image in Adobe Photoshop. Remember that your choice of method often hinges on the specific challenges posed by the image you’re working on.Select the Mannequin: Utilize one of the assortment tools (such as the Lasso Tool or the Magic Wand Tool) to delineate the mannequin meticulously. Exercise caution not to encompass any sections of the backdrop or other objects in your selection. Precision in your selection is pivotal to achieving a seamless outcome.
Content-Aware Fill:
Proceed to “Edit” > “Content-Aware Fill.”Within the Content-Aware Fill workspace, confirm you’ve opted for “New Layer” beneath the “Output To” option. This enables non-destructive editing, preserving the original image. Select “Generate Fill Layer.” Photoshop will then endeavor to populate the selected area using content derived from the surrounding vicinity.
Enhance the Result:
Bear in mind that the Content-Aware Fill tool may not invariably deliver a perfect result. You may need to employ tools like the Clone Stamp Tool or the Healing Brush Tool to refine the image further and achieve a seamless appearance. Patience and meticulousness are your allies in this phase. Preserve Your Work: Once content with the outcome, safeguard your edited image. Keep a duplicate of the original image as a backup.
Method 2: Clone Stamp Tool (for Complex Backgrounds)
Suppose the mannequin is placed against a complex backdrop replete with numerous details. In that case, the Clone Stamp Tool may be your preferred option for manually replicating portions of the background: Open the Image: Commence by opening the image in Adobe Photoshop. The Clone Stamp Tool provides you with increased control and precision, rendering it ideal for intricate backgrounds.
Zoom In:
Magnify the section where the Ghsot mannequin is situated to ensure precision. Don’t rush this stage; meticulousness will yield dividends in the final outcome.
Select the Clone Stamp Tool:
Locate and activate the Clone Stamp Tool from the Photoshop toolbar. Modify the brush dimensions and hardness to harmonize with the adjacent background.
Sample a Source:
Press and retain the Alt key (Option key on Mac) and click on an area of the background that you wish to duplicate. This will function as your source point, imparting the texture and color information you’ll employ to recreate the background. Overlay the Mannequin: Gently superimpose the mannequin employing the Clone Stamp Tool, using your sourced reference point to reconstitute the background. Ensure you blend the peripheries seamlessly to render the alteration practically imperceptible.
Fine-tune as Necessary:
Persistently sample diverse sections of the background and adapt your brushwork to mirror the surroundings faithfully. This step necessitates a discerning eye and a steady hand.
Secure Your Work:
After successfully eliminating the mannequin and reestablishing the backdrop, secure your edited image, preserving your hard-earned result.
How Do Ghost Mannequins Work?
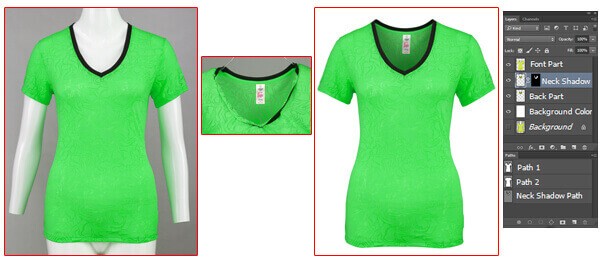
Ghost mannequins, also known as invisible mannequins or hollow mannequins, are a type of photography and display tool used primarily in the fashion industry to create images of clothing that appear to be worn by an invisible model. Here’s how ghost mannequins work:
The Mannequin Design:
Ghost mannequins, also called invisible dress forms or hollow models, are akin to assembling a wardrobe companion using detachable segments, resembling a sartorial puzzle.
Dressing the Mannequin:
Attiring the ghost mannequin is akin to outfitting an inanimate amigo, somewhat rigid and notably lacking in fashion critiques. Ensure the attire aligns seamlessly with their aesthetic.
Photography Setup:
The illumination arrangement is pivotal, tantamount to orchestrating the ideal lighting symphony that eradicates any enigmatic shadows.
Camera Positioning:
Picture it as the quest for the ultimate vantage point, akin to discovering the prime facet for your pet’s Instagram debut. Align with their perspective to unveil the clothing’s preeminent attributes.
Photography Process:
Think of it as capturing an abundance of family snapshots at a festive gathering – you must cover a myriad of perspectives to prevent Aunt Mildred’s ornate chapeau from obscuring anyone’s visage.
Post-Processing:
At this juncture, envision a conjurer wielding their Photoshop wand, performing the feat of making the mannequin vanish into thin air, granting the attire the spotlight it deserves.
Final Images:
Behold! You’ve metamorphosed your invisible mannequin into a fashion maestro, proficient in enhancing the allure of any ensemble while maintaining a discreet presence.
Finally
To remove a mannequin from a photo, you have a couple of effective options at your disposal. Firstly, you can employ the clone stamp tool to duplicate and blend nearby background elements over the mannequin, seamlessly covering it. Secondly, you may use the eraser tool to meticulously erase the mannequin from the photo, ensuring that the surrounding background remains unaffected. The choice between these techniques should be based on the specific requirements of the image and the desired outcome. Keep in mind that more advanced photo editing software might offer additional sophisticated methods, such as content-aware fill or masking, for even better results. Experiment with these techniques to achieve the most suitable and appealing outcome for your particular photo editing needs.